The command to do this is
If I start with a binary (blank and white only) image, I end up with a grayscale image; that's what pnmscale normally does when reducing an image. (It just averages the data values of the 64 pixels that are reduced to a single pixel.) But when we average black and white pixels together, the resulting gray level is a photometric gray; it needs to be adjusted for the gamma of the monitor before it can be displayed correctly.
To do this, pipe it through pnmgamma −cieramp.
If you don't do this, you get an abnormally dark image. For example, if half the original pixels were black (0) and half were white (255), the average would be 127, which is displayed at less than 20% the brightness of a white area.
A similar averaging problem occurs in the sharpening process. There, the amplification of digitizing noise produces large excursions in the output image. These excursions are averaged photometrically when displayed; so it's necessary to convert the image to a linear intensity scale before sharpening, and then convert it back to a transfer-curve-compensated version before displaying it.
 But, even after transfer-curve compensation, the averaged binary image
looks too dark. That's because the inked areas of the original page
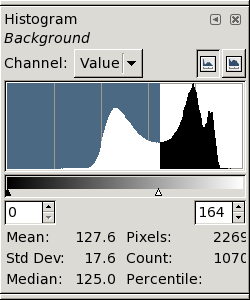
weren't perfectly black, just dark gray. For example, look again at the
histogram of the original, unprocessed image: →
But, even after transfer-curve compensation, the averaged binary image
looks too dark. That's because the inked areas of the original page
weren't perfectly black, just dark gray. For example, look again at the
histogram of the original, unprocessed image: →
Here, the inked areas form the lower peak of the histogram, centered near a data value of about 120. Even the darkest “black” pixels have values larger than 80 or 85. That's about a third of the white value (255); after allowing for the 2.4-power transfer curve, their actual brightness is only a few per cent that of the white (paper) areas.
But when we threshold an image, the dark areas are forced to exactly zero, which is perfectly black — indeed, blacker than the blackest black we can print on paper.
Therefore, it's necessary to add something to the dark areas after thresholding, to restore the dark-gray shade of inked paper. But if we added a constant to all the pixels, the whitest ones would exceed 255. Fortunately, the pnmarith program simply truncates values that try to become “whiter than white”; so the easiest thing to do is just use it to raise the level of the inked pixels from perfectly black to some reasonable value.
echo "P2
1 1
255
50" > gray1.pgm
That makes a 1-pixel gray image, having 50 as its gray value. Now we expand it to match the size of the image whose pixels we want to increment by 50:
pnmscale −xsize=width −ysize=height gray1.pgm > big.pgm
Here, use the actual numerical values of the width and height of the grayscale image to be modified, in place of the dummy names width and height. [If you don't know the dimensions of your image, the identify command (from ImageMagick) or the pnmfile command (from netpbm) will tell you what they are.]
Now, big.pgm is a gray image the same size as the real image you want to increment by 50. So we just add the two images (and convert the result to a PNG for compactness). If the original image is data.pgm, the following command line does the trick:
pnmarith −add big.pgm data.pgm | pnmtopng > fixed.png
But remember to do all this immediately after thresholding the sharpened image, and before any other grayscale manipulations.
Copyright © 2006 – 2009, 2012 Andrew T. Young
or the
GF home page
or the website overview page