 Here, the arc AB represents the surface of the Earth, with center at C.
The observer at O is a height H obs above A. The dashed
arc OD represents a level surface at the height of the observer.
Here, the arc AB represents the surface of the Earth, with center at C.
The observer at O is a height H obs above A. The dashed
arc OD represents a level surface at the height of the observer.
But the ray curvature depends on the atmospheric lapse rate , as described on the bending page.
This page provides a simple JavaScript program to estimate the apparent altitudes of distant objects.
To begin with, we know that the 6.5°/km lapse rate of the Standard Atmosphere is unrealistic. So let's do the calculation for any specified lapse rate, γ.
We can either set the lapse rate directly, or calculate it from the temperatures at two different heights. The scripts used below allow both options.
Assuming a constant lapse rate greatly simplifies the problem. Then, provided that the rays are nearly horizontal, and that the thickness of the layer they span is much smaller than the 8 km reduced height of the atmosphere, the rays are nearly arcs of circles; so we can make use of many simple results for this case, like Lambert's (1759) demonstration that such refraction produces a nearly undistorted image of distant objects that is simply displaced in the vertical direction. (Cf. the bending page, and the discussions of terrestrial refraction, and of looming and sinking.)
Therefore, if we can find the apparent altitude of any point of the distant object, we can easily find the altitudes of all the others. (See the simulations of looming and sinking for ray-traces of examples.)
A second simplification is that good approximations for the dip and distance of the horizon are available in closed form for this case. Both can be calculated from simple geometry if we adopt an effective curvature for the Earth that's the difference of curvatures of the actual surface and the circular ray. It's as if the Earth's radius of curvature R had been replaced by Reff = R / (1−k ) , where k is the ratio of curvatures discussed above. In particular, the distance formula (which will be used shortly) can be written as
where d is the distance to the horizon, and h is the height of the eye above the level surface that forms the apparent horizon .
The dip- and distance-formulae apply to any ray tangent to a spherical surface of radius R ; such a ray is horizontal at the point of tangency. The same geometric relations apply to any spherical surface; it doesn't have to be the Earth's surface. We can choose the surface to be a level surface through the observer, so that the point of tangency is at the observer's eye. Then the height h is the height of this ray above the eye, at a distance d from the observer.
So let's consider a horizontal ray at the observer: everything along this ray appears at the observer's astronomical horizon. The following diagram shows the details.
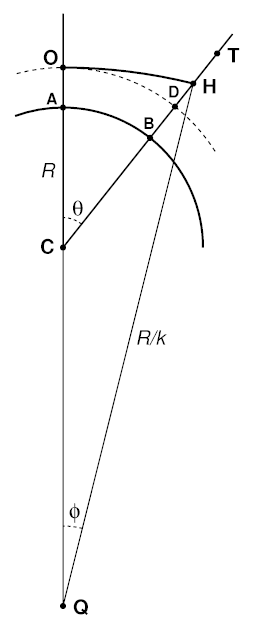
Here, the arc AB represents the surface of the Earth, with center at C.
The observer at O is a height H obs above A. The dashed
arc OD represents a level surface at the height of the observer.
The heavy arc OH is the ray that's horizontal at the observer ; so any point on it is seen at the observer's astronomical horizon. It's usually less curved than the Earth, so that's how I've drawn it. Q is the center of curvature of the ray OH , whose radius of curvature is (R / k ).
The observer sees a target point, T, located a height H target above the point B on the Earth's surface. (I omit the ray connecting O to T, as we don't really need it.) The line CBDHT is the local vertical through T, just as CAO is the local vertical at the observer. The angle θ between these two verticals is rarely as large as 2 or 3 degrees; it has been grossly exaggerated in the diagram. (Likewise, the heights of all the points above the Earth's surface — again, grossly exaggerated in the drawing — are negligible, not only in comparison to the Earth's radius, R , but also in comparison to the horizontal distance between A and B , or O and D.)
Because θ and the heights are all so small, we can regard all the points B, D, H and T as being practically the same distance d from O.
If we use the level surface OD instead of the Earth's surface AB, the distance formula still applies, provided that we use the height difference between H and O (or H and D, which is the same height above B as O is above A) as the height h in the formula; that is, h = DH = H H − H obs.
So, solving the distance formula for h , we have:
And as this is just the difference between H H and H obs, we find that H H = H obs + h .
But, as every point on OH appears at the observer's astronomical horizon, in particular the point H is seen on that horizon; so its altitude is exactly zero. So the height of H provides a reference point of known altitude, to which we can refer every other point on the vertical BDHT.
That means that the angular altitude of the target T above the observer's astronomical horizon is just the angle subtended by the height difference (H target − H H) at a distance d . This angle is (H target − H H) / d radians, because the (assumed) constant lapse rate produces no image distortion.
So, to sum up: we first use the lapse rate to determine the ray curvature. We then use the ray curvature to find the height of the observer's astronomical horizon, H H, at the distance d of the target. Finally, we find the angular height of the target point above the observer's astronomical horizon from the height of the target above the horizon point, H.
Having determined the lapse rate, we find the ratio of curvatures of horizontal rays and the Earth's surface, using the equation above. (Actually, I include an additional factor of exp(−H / 8 km) to allow for the decrease in atmospheric density with height.)
Results: Your values gave k = ___ , corresponding to a radius of curvature for the ray of ___ km.
All that remains is to find the apparent altitude of the target — which was the original goal. To do this, we need to know the distance from the observer to the target.
Finally, we find the apparent altitude of the target: ___ minutes of arc = ___ degrees of arc.
To find the distance to the observer's sea horizon, we use the distance formula from the top of this page, being careful to use H obs for the value of h in the formula; this assumes that the same ray curvature found above extends down to the sea surface. For your values, the distance to the sea horizon is ___ , which puts the target on the ___ side of the horizon. ... .
In your case, the dip of the sea horizon is ___ minutes of arc, or ___ degrees. These values place the target ___ minutes of arc, or ___ degrees, ___ the apparent sea horizon. ___
But this upper surface is missing from the oversimplified model adopted here: we have assumed a constant lapse rate throughout the boundary layer. So there's no way to determine the width of the blank strip. However, the Earth's surface appears concave to an observer within the strong inversion, so everything is visible — much as was predicted by Kummer in 1860.
Obviously, you can't set both the heights and both the temperatures, and then also type in a value for the lapse rate, without expecting some change to keep things consistent. I've written the scripts to keep the heights and the observer's temperature fixed, and re-compute the target temperature automatically, if you set the lapse rate manually.
If you change any of the values for the observer or the target, you'll need to re-set the lapse rate, either by clicking the Compute lapse rate button, or by entering something in the lapse-rate entry box below it. If you want to re-use the same lapse rate after changing a height or a temperature, just click in the lapse-rate box and add a space — being careful not to hit the “Enter” key (which would clear all your entries, because of a quirk in JavaScript). The ray curvature will be re-computed when you release a key in this box; some browsers will act even if it's a <Shift> key or a <Control> key.
If you just change the target distance, everything that depends on it will be recomputed automatically.
Clearing an entry box is equivalent to entering zero there.
Notice that the running text that reports the results will change when you change the critical input data. This only works with browsers introduced after Netscape 4; if you have problems with a modern browser, please let me know.
Copyright © 2009 – 2010, 2020, 2021, 2023 Andrew T. Young
or the
dip of the horizon page
or the
looming page
or the
GF home page
or the website overview page